Emulation has made it possible for gamers to enjoy classic PlayStation 2 titles on modern computers, and PCSX2 remains the most popular and feature-rich PS2 emulator available. However, one essential component that often confuses beginners is the PS2 BIOS. Without the correct BIOS files, PCSX2 cannot boot, run games, or operate properly.
In this detailed guide, we’ll explain what PS2 BIOS for PCSX2 is, how to get PS2 BIOS for PCSX2, how to put/add BIOS into PCSX2, and everything else you need to know about PCSX2 BIOS ROM files. Whether you’re setting up the emulator for the first time or troubleshooting BIOS errors, this is the only guide you’ll need.
What Is PS2 BIOS and Why Does PCSX2 Need It?
The PS2 BIOS (Basic Input/Output System) is the firmware embedded inside every original PlayStation 2 console. It is responsible for:
- Booting the system
- Reading Game Discs
- Handling hardware initialization
- Operating the PS2’s internal system menu
- Managing memory cards and storage
PCSX2, being an emulator, replicates PS2 hardware — but it cannot legally include Sony’s BIOS. Because the BIOS is copyrighted, PCSX2 developers cannot distribute it. As a result, the emulator requires users to provide their own PS2 BIOS ROM from their own console.
This is why when you install PCSX2 and launch it for the first time, it will prompt:
“BIOS not found. PCSX2 requires a genuine PS2 BIOS to run.”
Without a BIOS ROM file, PCSX2 cannot start a game or even boot into the PS2 menu. This makes the BIOS the most crucial component for proper PS2 emulation.
Is It Legal to Download PS2 BIOS for PCSX2?
This is one of the most commonly asked questions — and it’s important to clarify:
✔ YES, using PCSX2 is legal.
❌ NO, downloading PS2 BIOS from the internet is not legal.
Sony owns the BIOS, and distributing it online violates copyright law. Therefore, what you can legally do is:
Dump the PS2 BIOS from your own PlayStation 2 console.
If you own a PS2, you have the right to extract the BIOS and use it with PCSX2 for personal use. Many websites offer downloadable BIOS files, but these are unofficial and often contain malware, corrupted data, or outdated dumps.
How to Get PS2 BIOS for PCSX2 (Legally)
To legally obtain PS2 BIOS for PCSX2, you must extract or “dump” it from your actual physical PS2 console. This process might sound technical, but it has become simpler thanks to homebrew tools.
Below is a high-level and beginner-friendly guide.
Step 1: Prepare Your PS2 for Homebrew
To run a BIOS dumper, your PS2 needs to be able to run homebrew software. You can do this through several methods:
- FreeMcBoot (FMCB) – runs from a memory card
- FreeDVDBoot – loads homebrew from a burnable DVD
- Fortuna Project – works on specific PS2 models
- Modchips (optional, not required)
For most users, FreeDVDBoot is the easiest because it requires only a DVD and does not need preinstalled mods.
Step 2: Download a PS2 BIOS Dumper Tool
Several community-made dumpers exist, such as:
- BIOSDump Tool
- Biosdrain
- uLaunchELF + Dump Module
You simply copy the .elf file to a USB drive formatted in FAT32.
Step 3: Run the BIOS Dumper on Your PS2
- Boot FreeMCBoot or FreeDVDBoot.
- Launch uLaunchELF or your preferred homebrew launcher.
- Open the BIOS dumper application from your USB stick.
- Choose Dump BIOS.
- The tool will extract:
scphxxxxx.bin(BIOS ROM)rom0,rom1, and sometimeserom- NVM/MEC files (optional)
These are the files PCSX2 needs to function accurately.
Step 4: Move BIOS Files to Your PC
After the dumping process completes:
- Remove the USB drive from your PS2.
- Insert it into your computer.
- Copy all dumped BIOS files to a folder on your PC (e.g.,
Desktop\PS2_BIOS\).
You now have a genuine PS2 BIOS ROM ready for PCSX2.
How to Put BIOS into PCSX2
Once you’ve obtained the BIOS ROM files, follow these steps to properly add them into PCSX2.
The process is similar for Windows, Linux, and macOS.
Step 1: Locate PCSX2’s BIOS Folder
On Windows, the default BIOS directory is usually:
Documents\PCSX2\bios
or the folder inside your PCSX2 installation directory:
PCSX2\bios
If it doesn’t exist, simply create it manually.
Step 2: Copy PS2 BIOS Files into the BIOS Folder
Move all BIOS ROMs you dumped — usually .bin, .mec, .nvm, or regional BIOS files — into the bios folder.
Make sure the folder contains actual dumped files, not .zip or .rar archives.
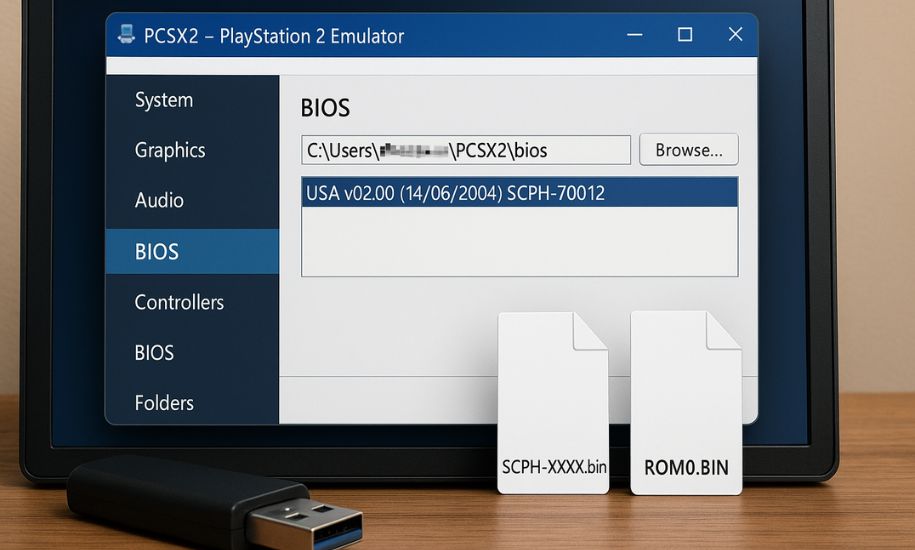
Step 3: Configure PCSX2 to Use the BIOS
Now open the PCSX2 emulator:
- Go to Settings.
- Open the BIOS section.
- Click Browse to select the BIOS folder you just populated.
- PCSX2 will automatically scan and detect available BIOS ROMs.
You should now see something like:
- USA v01.60 (SCPH39001)
- Europe v02.00 (SCPH70004)
- Japan v01.00 (SCPH10000)
Step 4: Select the Correct BIOS Region
This step matters more than most people think.
- Use a USA BIOS for NTSC-U games
- Use a European BIOS for PAL games
- Use a Japanese BIOS for Japanese imports
Choosing the matching BIOS region ensures:
- Proper video output (60Hz/50Hz)
- Better compatibility
- Fewer game crashes
Step 5: Save & Restart PCSX2
After selecting your BIOS:
- Click Apply → OK
- Restart PCSX2
The emulator should now successfully boot into the PS2 main menu — a sign that your BIOS is working perfectly.
How to Add BIOS to PCSX2 (In Case of Errors)
Sometimes PCSX2 might still show:
“No BIOS Found” or
“BIOS is missing or invalid.”
Here’s what usually fixes it:
✔ 1. Make sure BIOS files are extracted
Do not put ZIP or RAR archives into the BIOS folder. Extract them first.
✔ 2. Confirm the folder path
Verify that PCSX2 is pointing to the correct BIOS directory.
✔ 3. Avoid corrupted BIOS files
If you downloaded BIOS from a random website, it may be damaged.
Dumping your own ensures no corruption and full legality.
✔ 4. Avoid mixing file types
PCSX2 prefers original BIOS sets from one region or console.
✔ 5. Run PCSX2 as administrator
Sometimes permissions block access to the BIOS folder on Windows.
After fixing these issues, PCSX2 should detect the BIOS normally.
PCSX2 BIOS ROM: Understanding File Types
A complete PS2 BIOS package often includes:
SCPHXXXXX.bin– main BIOS ROMrom0&rom1– system moduleserom– extended ROM (used by newer consoles)MEC/NVMfiles – memory & region info
PCSX2 doesn’t always need every file, but having the full dump ensures maximum compatibility with all PS2 titles.
Why You Should Use Your Own PS2 BIOS Instead of Downloading One
Many users try to download PS2 BIOS from Google — but there are serious downsides:
❌ Illegal & unsafe
Most BIOS downloads violate copyright and many contain malware.
❌ Corrupted BIOS dumps
Users report frequent issues:
- Games freezing
- Black screens
- Emulator crashes
- Audio glitches
❌ Wrong region BIOS
Different blog sites upload BIOS files without region labels, causing mismatches.
✔ Dumping your own BIOS solves everything
It ensures:
- Full compatibility
- No malware risk
- No copyright issues
- Accurate PS2 emulation
Conclusion: The Right Way to Use PS2 BIOS for PCSX2
Setting up PS2 BIOS for PCSX2 may seem complex at first, but once you understand the process, it becomes straightforward:
- Dump your BIOS from your own PS2 console.
- Copy BIOS ROM files into the PCSX2 BIOS folder.
- Select the correct BIOS region in PCSX2 settings.
- Restart the emulator and enjoy your games.
With the correct BIOS, PS2 emulation becomes smooth, accurate, and fully legal. PCSX2 is one of the most powerful emulators today, and having your own PS2 BIOS ensures the best gaming experience.
If you found this guide helpful and want more tech tutorials, gaming guides, or emulator-related content, feel free to check out our site: MoviesMod.
You May Also Read: Pxless: The Rising Roblox Edit Creator Dominating YouTube Shorts